Getting Started with Motion Storyline
Motion Storyline saves time and boosts productivity by providing a conceptual framework for creating videos in a familiar format borrowed from web creation. Create branded designs simply and instantly, or dive deeper into powerful customization features. Avoid the pitfalls of using templates, which create extra work fitting your brand and story into something made for general use.
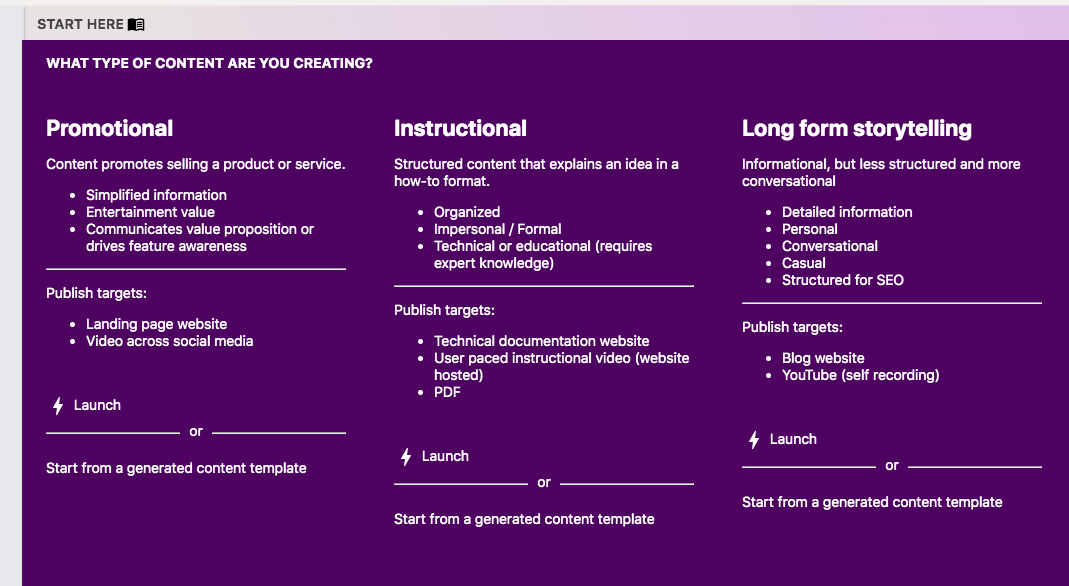
Motion Storyline can create promotional, instructional material, and long-form storytelling video. Promotional publishes flashy video as well as HTML landing pages. Instructional publishes user paced videos as well as HTML + PDF technical documentation. Long-form video publishes screen recordings with organizational slides as well as HTML blog pages. Create once and publish content for any modern platform.
This is a massive and exciting journey and undertaking for Motion Storyline and sharing this vision means an exciting investment into your evolving use cases for digital storytelling.
Import a premade template
If you aren't sure what each of the three categories does for you, you can import pre-made templates with example information filled in and publish to the format of your choice. Just click the templates icon at the top of the screen.
Intro to the recording studio
Record your screen as an information presentation, or an asset.
- Record your screen or tab
- Record yourself in video form
- Record just audio
Please note: Google Chrome is recommended for best results, and other browsers may or may not work correctly.
3D tab
Access a modified version of the Three.js editor from within the app. You can import and save three.js projects. See additional documentation coming soon.
3D tab
Access a modified version of the Three.js editor from within the app. You can import and save three.js projects. See additional documentation coming soon.
Projects and tasks
Tasks belong to larger projects - project settings can be thought of as "parent" settings of children tasks. Global settings in projects apply to tasks. For example, in the landing page theme each task represents a landing page, and any styling or call-to-action text in the project settings would appear on all the pages. The "parent" project page for all the landing pages might be conceptualized as the home page for a website with many landing pages. Each landing page might represent a product feature and the landing page might have a feature section which summarizes each feature. However Motion Storyline's landing page theme cannot export the home page - the reasoning for this is usually the home page requires a very specifically crafted style and is the place to showcase front and center all of the uniqueness of a brand. A generated page would be too formatted to be good design. There are still a number of options to do this with Motion Storyline - the easiest is to just use a modified theme from Webflow and customize it.
A more relevant and powerful way of working together the multiple parts created would be to embed the animation version of tasks which each represent a feature for the landing page theme. The embed can be linked from each feature on the home page and the home page could link to both the landing page as well as the video. The Motion Storyline home page does exactly this and uses the landing page theme and each task represents a product feature.
A more relevant and powerful way of working together the multiple parts created would be to embed the animation version of tasks which each represent a feature for the landing page theme. The embed can be linked from each feature on the home page and the home page could link to both the landing page as well as the video. The Motion Storyline home page does exactly this and uses the landing page theme and each task represents a product feature.
Create structure in written content
The building blocks of Motion Storyline is the written content. Projects should use succinct, headline style overarching descriptions of topics followed by short descriptions. If multiple outlines all fall under the main concept umbrella, each one should be created as a task under the project - in many cases no descriptions in the project level will even be necessary.
Each task will also need a brief summary description of the topic, and then more expanded descriptions in long format. Pay close attention to headings - it is a good practice to create a headline for each description box with a quick summary. Headlines should be consistent if used, and may need to stand on their own as they are extracted in summary formats with the following description omitted.
Each task will also need a brief summary description of the topic, and then more expanded descriptions in long format. Pay close attention to headings - it is a good practice to create a headline for each description box with a quick summary. Headlines should be consistent if used, and may need to stand on their own as they are extracted in summary formats with the following description omitted.
Add additional resources for animation format
Click the AWS icon for any box to expand the create audio button. This uses Amazon Web Services AI voices to turn your text into an audio track. This is a great placeholder for video if you intend to hire a professional voice over artist for the final version. Using this feature will give you a great sense of timing, verbiage and content in video format, and allow for changes in real time without incurring expensive audio recording costs to make updates.
It is also recommended to use screenshots initially as placeholders for product walkthroughs. Try to separate out your walkthrough into structured concepts or topics - instead of trying to prepare for a live presentation that shows end to end functionality (which can be overwhelming and stressful), first just write out each small section of what you need to cover and use a screenshot to represent it with a generated voice over. Everything will start to fall into place and you will know exactly what you need to record in your live screen recording. Each screen recording should be recorded separately and replace each static screen shot. This prep work makes recording unnecessary takes much less likely.
It is also recommended to use screenshots initially as placeholders for product walkthroughs. Try to separate out your walkthrough into structured concepts or topics - instead of trying to prepare for a live presentation that shows end to end functionality (which can be overwhelming and stressful), first just write out each small section of what you need to cover and use a screenshot to represent it with a generated voice over. Everything will start to fall into place and you will know exactly what you need to record in your live screen recording. Each screen recording should be recorded separately and replace each static screen shot. This prep work makes recording unnecessary takes much less likely.
Use existing page content
If you already have landing page content, just copy/paste in into Motion Storyline. This content will generate landing pages if you use the landing page theme in static site HTML. This is very SEO friendly, performant code that gives you the best possible technical foundation for keyword researched content writing. You may also use generated PDF and / or animation formats with the pages you already have, and both formats can be embedded into HTML.
Advanced customization
Choosing the color tab from the dashboard allows for additional branding to be placed into generated formats. Not all themes can support all the options, but you can change themes in the future to re-use the same content. Create a new gradient - it will automatically generate the gradient from the main brand color you have for your project. Save it out to the correct project and it will now show up when you generate or export your project.
Choosing the layout tab will give you a wireframe representation of the layout variations you can choose. Save out any changes to the project you want to apply the layout to.
For advanced design details, go into the project or task and click on visual mode from the bottom menu. Storybook will launch and give you a menu of each design component and a preview of the Figma file that represents the component. Open the file in Figma and copy it to your personal account. Make any edits you need to and you can re-import the component using the Figma documentation for how to set up integrations of the Figma API.